When we launched NRE Labs last month, the feedback was very positive. While it’s still early, we’re really excited about the momentum that’s already building toward building a community around a comprehensive set of automation workflows represented as simple lessons in the browser.
On the latest Packet Pushers Priority Queue episode, Derick and I shared how NRE Labs is powered by 100% open-source software, ranging from off-the-shelf software we used for the solution, such as Kubernetes and Apache Guacamole, as well as custom-built software under the Antidote project.
In that episode and in our blogs thus far, we mention that the software that powers NRE Labs isn’t the only thing that’s open source; we’ve also open sourced the curriculum itself, enabling users to contribute to each individually as they see fit.
This may sound a bit strange. These days, open-source software is very much in fashion, so conceptually this is fairly easy to understand. However, understanding how a curriculum can be open sourced can be more difficult. In this post I’d like to spend some time explaining what we mean by this, and how our move to codifying the curriculum behind NRE Labs makes it easier for you to contribute content of your own.
High-Level Antidote Architecture
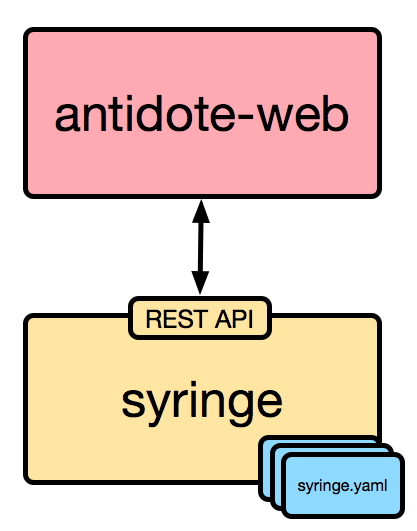
In order to understand how we’ve codified our automation curriculum, we first need to understand a little bit about how Antidote works. Below is a very high-level diagram of the relevant components and how they interact:
In short:
- Antidote-web is the web front-end that contains the lesson guide, the guacamole terminal, embedded web resources, and anything else that the lesson is trying to show.
- Syringe is the back-end component that orchestrates the creation of resources inside Kubernetes. It publishes its own REST API and Antidote-web uses this to instruct Syringe to create a new lesson, among other things.
It’s important to understand that there are no lessons built into either Antidote-web or Syringe. They are both populated with content found elsewhere.
In the case of Antidote-web, it receives all content from Syringe. When a lesson is accessed in the browser, Antidote-web sends the relevant lesson ID to Syringe via its REST API, and Syringe gets to work provisioning all of the resources involved with that lesson. Once finished, it will make those resources available to antidote-web, which will then render them on the front-end
So how does Syringe know what resources to create for each lesson? As mentioned previously, there’s no lesson content natively built into Syringe itself; instead, Syringe pulls lesson details from a set of directories made available to it. Each of these directories contain a set of files that define a lesson; what resources it needs, lesson guides, diagrams, configurations, etc. All of these are stored as files, which means we can store those files in Git.
This is what we mean when we say we’ve open-sourced the curriculum. Syringe was designed from the beginning to pull lesson content from a directory made available to it, so that we could easily publish and maintain that content just like we publish the software that drives NRE Labs.
The Anatomy of a Lesson
Okay, that’s all great, but how is this possible? Let’s drill a little deeper.
For reference, let’s take a look at the contents of a lesson we discussed in a previous blog - Network Verification with JSNAPy:
~$ ls -lha lessons/lesson-12/

total 168
drwxr-xr-x   8 mierdin  staff   272B Nov  9 23:03 .
drwxr-xr-x  18 mierdin  staff   612B Nov  9 22:10 ..
-rw-r--r--   1 mierdin  staff   264B Sep  8 14:02 jsnapy_config.yaml
-rw-r--r--   1 mierdin  staff   738B Sep  8 14:02 jsnapy_tests.yaml
-rw-r--r--@  1 mierdin  staff    70K Sep 25 18:42 lessondiagram.png
drwxr-xr-x   5 mierdin  staff   170B Sep  8 14:02 stage1
drwxr-xr-x   5 mierdin  staff   170B Sep  8 14:02 stage2
-rw-r--r--   1 mierdin  staff   1.1K Nov  9 23:03 syringe.yaml
The cornerstone of any lesson definition is the syringe.yaml file. You can see this as the last item in the above list, as well as in Github.
This file contains a few important sections. First, we see a few fields describing the metadata of the lesson. Things like the lesson ID, the lesson name, and what category this lesson belongs to are all described at the top of the file.
We also see two sections named “utilities” and “devices.” This is where we declare to Syringe the Docker images we wish to participate in this lesson. When a lesson is started, Syringe instructs Kubernetes to start a Pod with the referenced image.
The section “connections” describes how these entities are meant to connect to each other. It is here where we’re able to construct a complex topology, so that we can do cool stuff like allowing vQFX devices to peer with each other.
Finally, every lesson is broken up into mini-labs called “stages.” There’s always at least one stage in a lesson.This is how we break lessons into logical “chunks” so we can keep learning experiences as accessible as possible.
These stages are named and described in the syringe.yaml file, but are also represented using their own subdirectory:
~$ tree lessons/lesson-12/stage1/

lessons/lesson-12/stage1/
├── configs
│   ├── vqfx1.txt
│   ├── vqfx2.txt
│   └── vqfx3.txt
└── guide.md
You can see that the guide.md file is the lesson guide for this particular stage. Each stage gets its own lesson guide. In addition, the configs directory contains the configuration files for the lesson elements that they’re named after. When the user tries to access this lesson’s first stage, the three configuration files will be applied to their respective network devices.
Every aspect of a lesson’s definition is codified into text files that we can store and version in Git. As a result, we can observe all the benefits that they bring, particularly around contributions - adding or changing a lesson is a simple matter of opening a pull request to change those files in Git.
There’s one more aspect that we haven’t explored yet. You may remember that in our syringe.yaml file, we reference several Docker images that Syringe instructs Kubernetes to use when instantiating a lesson. Where do those images come from?
This is a two-part answer. Quite simply, that image ID is passed directly to Kubernetes unchanged, so any image present in the repository that your Kubernetes distribution is configured to pull from can be placed in this field and it will be used within Antidote. However, in order to contribute your lesson to NRE Labs - Juniper’s sponsored instance of Antidote - you must also contribute the files that are used to construct the lesson, so that it can be hosted within the ”antidotelabs” docker hub repository.
You can see all of the existing image definitions in the Antidote repository. You may recognize the utility image there - this is the image we referenced in our syringe.yaml file.
Contribute! Because of all this, every aspect of Antidote and NRE Labs can be contributed to. You can pick and choose the aspect of the project you want to contribute to - whether the back-end infrastructure, the Antidote platform, or the curriculum that’s served by it.
We encourage you to take a peek at the curriculum contribution guide and consider contributing a lesson. This project was started with the intent of being 100% community-driven, so if you have a compelling automation workflow story you want to tell in this highly interactive format, we’d love to have you.
You may also be interested in our new podcast episode where Derick and I discuss the concepts behind Network Reliability Engineering, which heavily inspired the work that went into NRE Labs: